Deploy InfoChain
There are two options to deploy an InfoChain server: to download and run an InfoChain virtual machine, or install InfoChain server via provided script.
Both options require minimal 4GB RAM, 20GB free disk space. Please open firewall port 7050,7051,7053,7054,8051,8053,8054,15790-15794,15799 for TCP protocol, port 9999 for UDP protocol.
Please pay attention to adjust the VirtualBox network settings to ensure that the virtual machine can connect to the Internet. Every computer running InfoChain acts as a node in the InfoChain group, which means it will constantly keep heartbeat and data synchronization with other nodes. Please make sure that the host is always on and turn off the sleep setting to avoid interruption of backend heartbeat or data synchronization, which will affect the work of the entire InfoChain team.
1. Download and run an InfoChain virtual machine
User can download the virtual machine from the menu Resource > Download. After decompression, the virtual machine can be run through VirtualBox. If you are not familiar with this tool, please visit www.virtualbox.org to learn about and download VitualBox.
The default user name of the virtual machine is "user" and the password is "password". To ensure privacy and security, reset the password and restart the virtual machine.
After downloading and starting the InfoChain virtual machine, the InfoChain REST server should start automatically. You can verify via command:
ps -ef| grep REST| grep -v 'grep'
If there is output, means the REST server is working; otherwise, you need to manually launch the REST server via below commands:
source ~/.profile
cd ~/node
./REST &
2. Install InfoChain server via provided script
This option requires OS Ubuntu serial.
First, download installation script:
curl -k -O https://infochain.link/download/InstallInfoChain.sh
Second, set script permission:
chmod +x ./installInfoChain.sh
Next, run this script. If no error encountered during installation progress, there will be an additional node folder created in the $HOME folder, change current direction to the node folder, execute
./REST &
to launcn InfoChain REST server.
1. Configure Group Network
Click the first link in navigate bar, you will see the page as figure 1A when Group Net has not be configured.
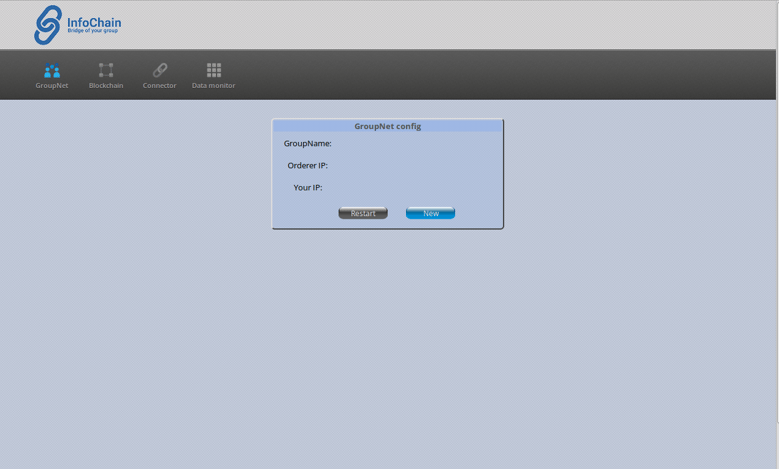

Figure 1A. Group network before starting
Here can see some properties of a group network:
GroupName: the name and ID of an InfoChain group
Orderer IP: the group creator’s IP
Your IP: current user’s IP inside the group
There are two buttons in this page if no group network running in background.
Restart button: to restart a stopped group network virtual device.
New button: to create a new group network.
Now click New button, in the popup window, type in the group name. System will check if the group name has be registered or not, then decide if this node can join this group, or should create a new group.
If group name has not been registered, means you wish to create a new InfoChain group, the popup window looks like below figure.
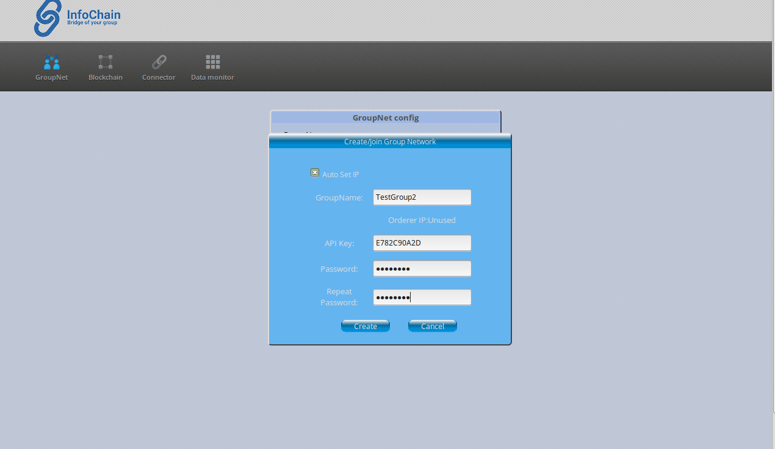

Figure 1B. Create new group network
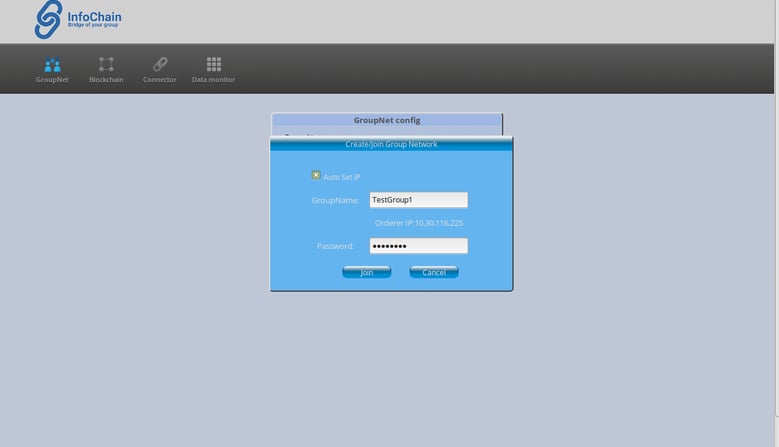

Figure 1C. Join an existing group network
Please type in every required items one by one.
GroupName: the unique name of an InfoChain group
IP: the IP4 address this node used to communicate with other nodes inside the InfoChain group. If you want to manually set IP, make sure the first byte is 10, for InfoChain group use 10.XX.XX.XX as P2P network IP.
API Key: only required when create new group. A registered user can apply for one API key from menu Resource > API Key.
Password: the group network password used to establish P2P network. An InfoChain group creator should record this password and share the group name and password with partners, so that his partners can join this group.
Click Create or Join button, Wait a few seconds for the group network virtual appliance to fully build.
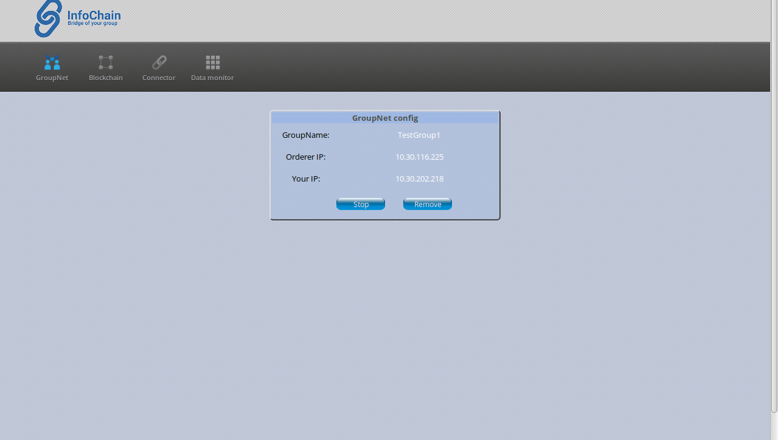

Figure 1D. Group network running
There are also two buttons in this page when the group network is working.
Stop button: to delete the group network virtual device and disconnect from the group network. This virtual device can be restarted.
Remove button: to delete the group network virtual device and disconnect from the group network, and remove related configurations. This virtual device can not be restarted.
Group network, can also be configurated via RESTReq command.
Create group network:
RESTReq Func:CreateGroupNet GroupName:[your group name] ApiKey:[your API key] Password:[group network password]
Join group network:
RESTReq Func:JoinGroupNet GroupName:[your group name] Password:[group network password]
Restart group network:
RESTReq Func:RestartGroupNet
Stop group network:
RESTReq Func:StopGroupNet
Remove group network:
RESTReq Func:RemoveGroupNet
Check group network status:
RESTReq Func:CheckGroupNetStatus
Otherwise, this node will try to join an existing InfoChain group.
After InfoChain REST server launched, it has to be properly configured before it can work as a InfoChain node.
Operator can configure InfoChain node via browser, or via command line terminatal.
To do configure via browser, open the chromium-browser in the virtual machine, and the default website has been set as the InfoChain configuration platform. If the browser does not navigate to InfoChain the configuration platform automatically, please navigate to http://localhost manually. In the following introduce, we suppose the operator do configure via browser by default.
To do configure via command line, InfoChain has provided the tool RESTReq, which will also be introduced later.
Step by step configure InfoChain
2. Configure Fabric network
After group network configured, this node has joined the domain of one InfoChain group. Next step is to establish or join a hyperledger fabric network, so that this node can synchronize data within the fabric network.
Now configure the fabric setting .Click the second link of the navigation bar.
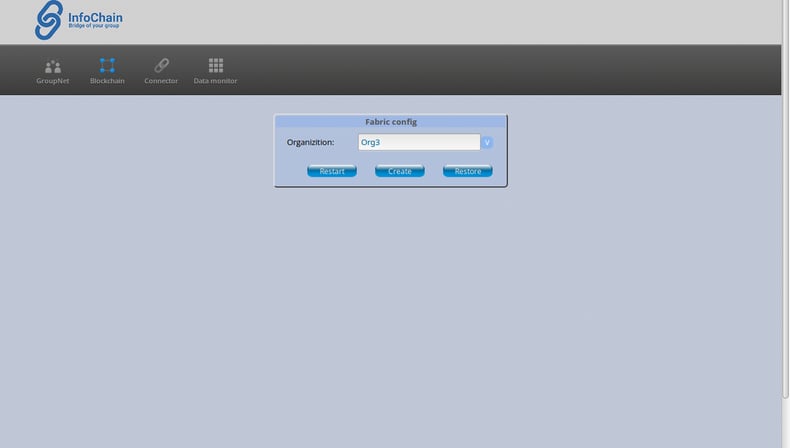

Figure 2A. Fabric network before starting
There are three buttons in this page when fabric network is not running on this node.
Restart button: to restart the existing frozen fabric network image
Create button: to create a new fabric network; or join into an existing fabric network
Restore button: to restore backup images to working path, and start them as working node.
When fabric network is running, InfoChain will backup fabric images every minutes. If work images were damaged by some accident, restore operation can help user to recover the data in this node.
As upper figure shown, there is only one parameter: Organization need user to set.
Organization is the unit inside a InfoChain to verify and endorse data blocks. A user can type in a new organization name to create a new organization under the InfoChain group, or select an existing organization by clicking the drop down list, to work as a member of this organization.
Note: When the user decide to create a new organization for this node, this node does not accept data adding/update request automatically, until the group creator added this organization into Policy list.
After clicking Create button, it will spend some minutes, to create or join a fabric network.
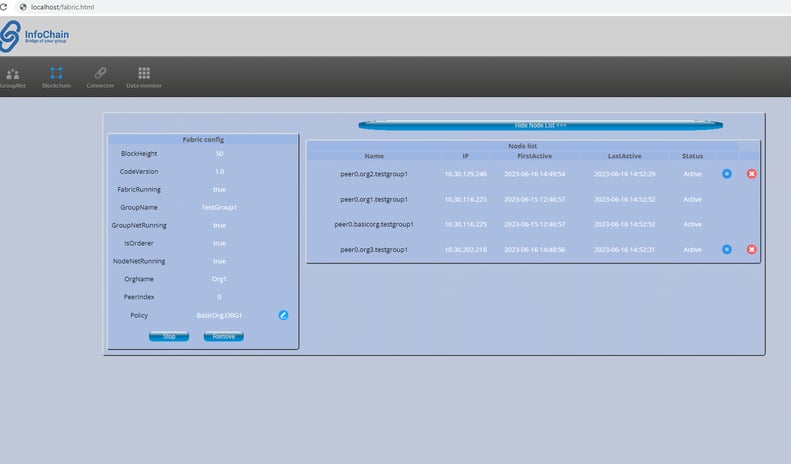

Figure 2B. Fabric network running as common node
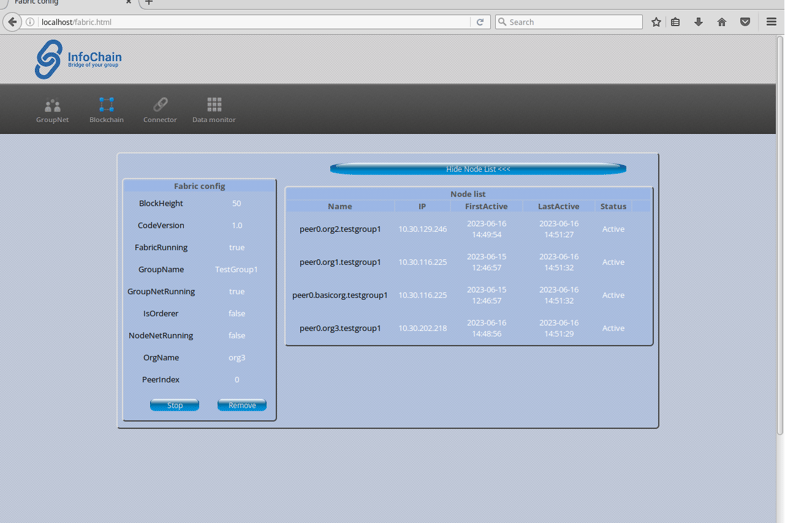

Figure 2C. Fabric network running as leader node
Common node: this node is created by users who join the InfoChain group. This node participates in the synchronization and verification of data streams transmitted to InfoChain.
Leader node: this fabric node is created by the InfoChain group creator. The responsibility of this node is not only to synchronize and verify the data flow transmitted to InfoChain, but also to sort the data blocks to be inserted into InfoChain, and to record the Fabric network connection status.
After creating or joining in fabric network, the user can supervise the parameters related with the fabric network working, such as organization name, peer index of the organization, data block height, chain code version, node list running in this group, etc.
There are two buttons in the left bottom corner of this page when fabric network is running.
Stop button: to stop this fabric node. If this node is a leader node, the stop operation will cause the whole fabric network stop work. If this node is a common node , the stop operation will cause this node break connection with fabric network, but other nodes in the fabric network can work still.
Remove button: to remove this fabric node and configuration. If this node is a leader node, the remove operation will cause the whole fabric network stop and removed, the fabric network can not be restart, data stored in fabric network will lose also, unless launch Restore operation. So a group creator should avoid using this operation without necessary. If this node is a common node, the remove operation will cause this node break connection with fabric network, and its configuration be removed also.
A group creator has the responsibility to ensure the group stability, so he need to:
I. Maintain the fabric policy
Policy: this is a collection of organizations that allowed to add and modify data in InfoChain. If an organization has not been selected into fabric Policy list, this organization’s member can only query the data.
Click on the edit icon on the right side of Policy item in network creator’s fabric configure page, the network creator can decide which organizations be selected into Policy list.
Click on the Update button in the popup window, then the fabric Policy and code version will be changed. This change request will be send to every nodes inside this group network one by one, so this operation can cost half minute to some minutes.
II. Stop or remove inactive or unsafe nodes
The group creator can mandatory stop or remove a node from the group by clicking on Stop or Remove icons on the right side of an existing node item.
If the group creator decide to stop a node, the leader node will send command to that node to remotely stop it and set it as inactive.
If the group creator decide to remove a node, the leader node will send command to that node to remotely remove it, remove it from supervising nodes list, and change fabric network structure if necessary.
Fabric network, can also be configurated via RESTReq command.
Create fabric network:
RESTReq Func:StartBlockChainNet OrgName:[your organization name]
Restart fabric network:
RESTReq Func:RestartFabricNet
Stop this fabric network:
RESTReq Func:StopBlockChainNet
Remove this fabric network:
RESTReq Func:RemoveBlockChainNet
Restore this fabric network:
RESTReq Func:RestoreBlockChainNet
Stop a common node from leader node:
RESTReq Func:StopNode NodeName:[the common node name]
Remove a common node from leader node:
RESTReq Func:RemoveNode NodeName:[the common node name]
Check fabric network status:
RESTReq Func:CheckFabricNetStaus
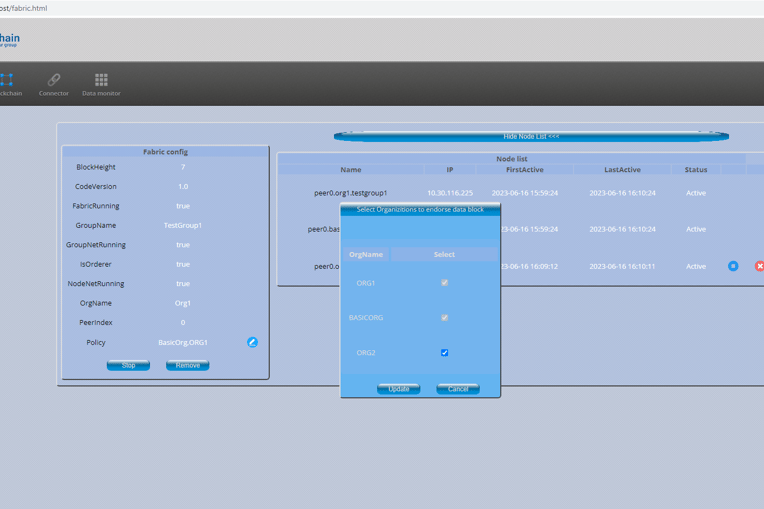

Figure 2D. Edit fabric network Policy
3. Configure Node network
After group network and fabric has been configured, this node has worked as a part of the InfoChain group, data flow will be synchronized to this node. But the terminal users can not access this node still. To allow outside users to access an InfoChain group, at least one node of this group must define its node network. In another word, if a node has defined its node network, the terminal users can access the blockchain data via this node.
Click the third link of navigation bar.
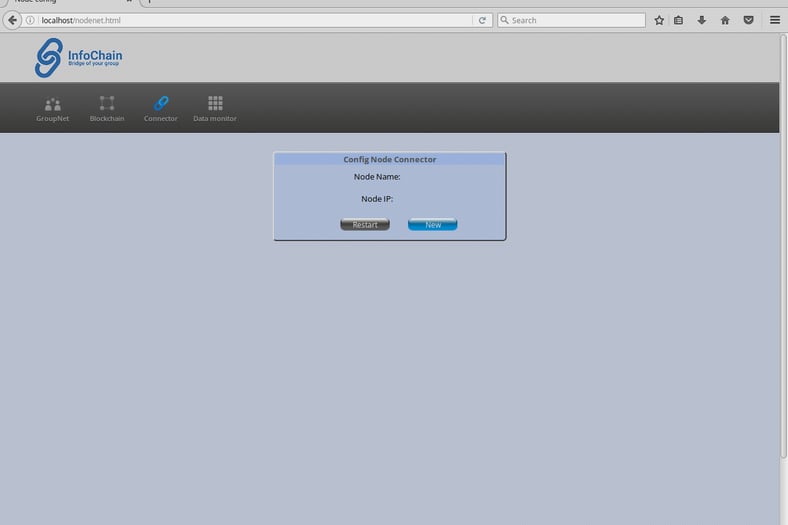

Figure 3A. Node network before working
Here can see some properties of a node network:
Node Name: the unique name of an node network. This is the identity of a node network.
Node IP: the server IP of this node group
There are two buttons in this page when node network is not working.
Restart button: to restart the configured node network virtual device
New button: to create a new node network virtual device, via this node network, the terminal user can access data stored in InfoChain.
Click on New button, in the popup window configure the node network settings.
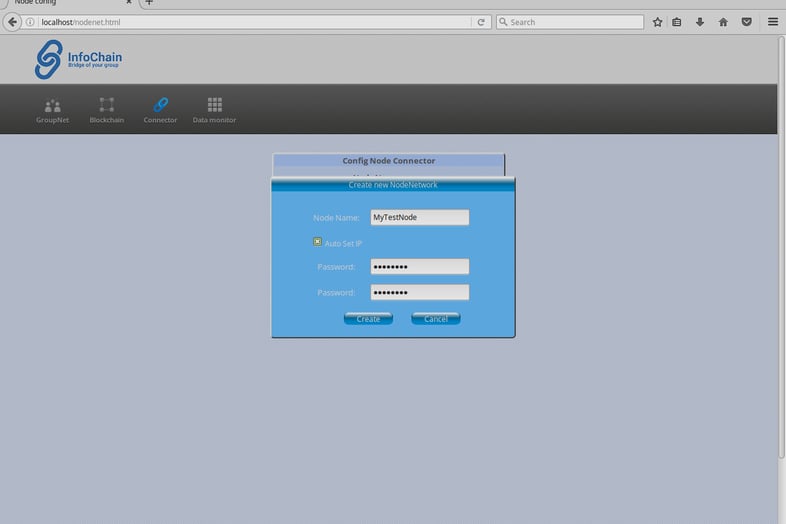

Figure 3B. Create Node network
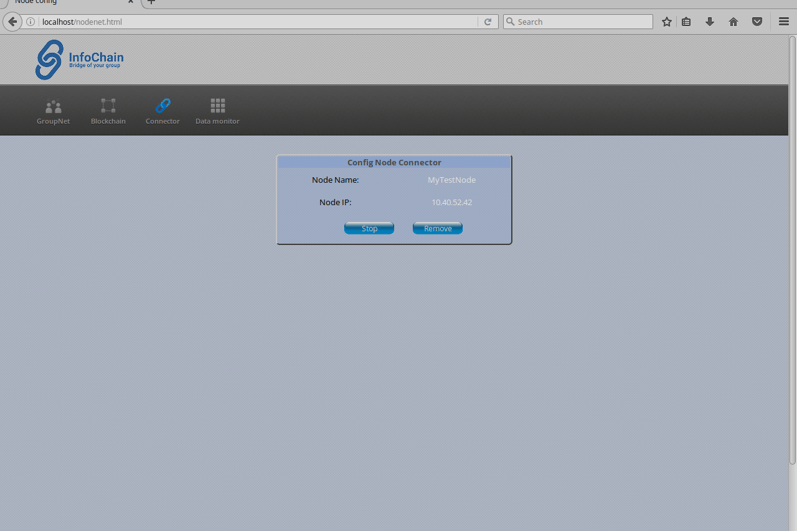

Type in this node network name, IP and password, then click Create button. The creator need to remember the node group name and password, then share them with the terminal users.
Figure 3C. Node network is working
There are also two buttons in this page when a node network is working.
Stop button: to stop the node network virtual device
Remove button: to remove the node network virtual device and configuration. This node network cannot be restarted
Node network, can also be configurated via RESTReq command.
Create node network:
RESTReq Func:CreateNodeNet NodeName:[your node name] Password:[your node network password]
Restart node network:
RESTReq Func:RestartNodeNet
Stop node network:
RESTReq Func:StopNodeNet
Remove node network:
RESTReq Func:RemoveNodeNet
Check node network status:
RESTReq Func:CheckNodeNetStatus
4. Supervise blockchain data
Click on the fourth link from navigation bar. From this page, the node creator can monitor data stored in the blockchain, even records that have been set as private.
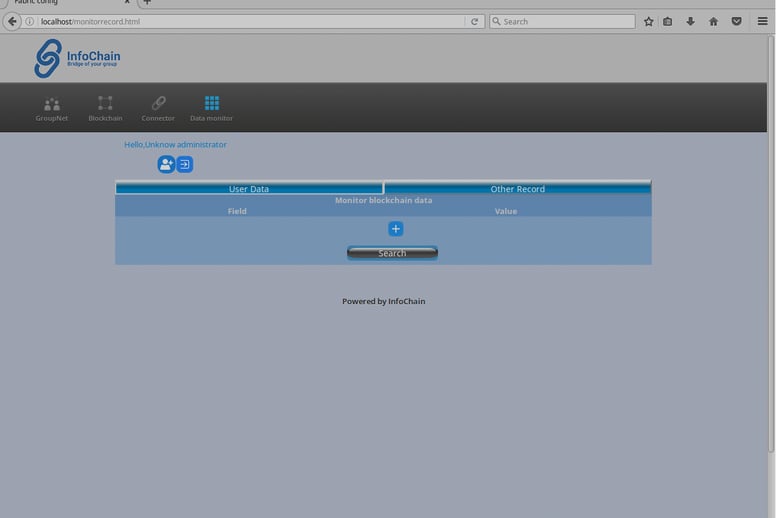

Figure 4A. supervise blockchain data page
InfoChain stores two kinds of data: user data and common record.
User data: user information to be used to verify operator's authority
Common record: user defined information according to user's business logic
Click on User Data button to search user data, click on Other Record button to search the common record.
The node creator can review public record by default. To review all user information and none public common records, the creator need to click Register or Login icon on the top-left corner of the page, to login or register as Administrator. Inside each InfoChain group, there are no more than 3 administrator accounts can be registered.
Click + button, add more conditions to search.
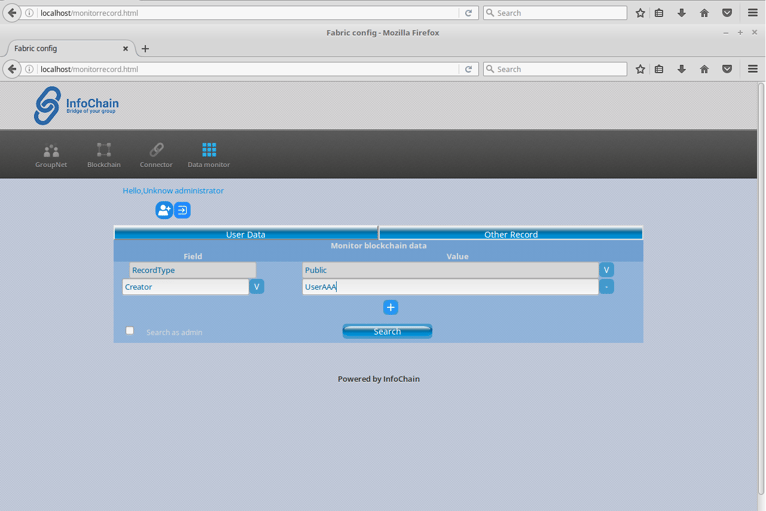

Figure 4B. Add more search conditions
Click Search button to view filtered record
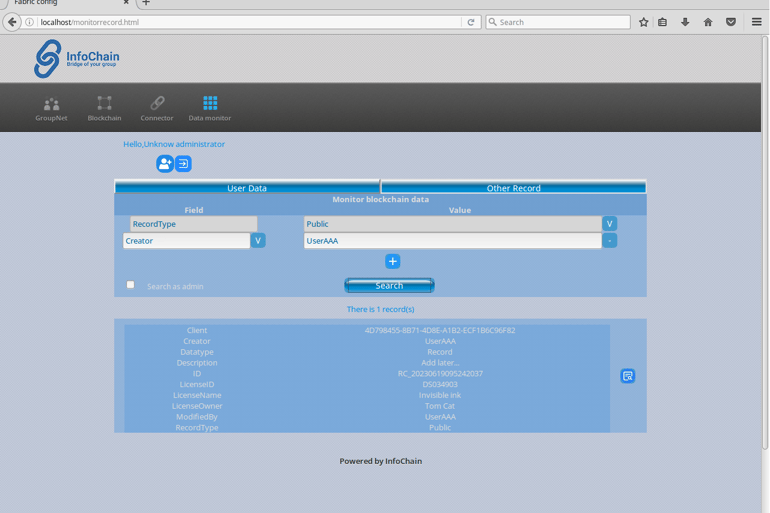

Figure 4C. Show filtered public records
To search private record or User Data, need to check on Search as admin checkbox

Figure 4D. Show filtered private records
There is a History icon on the right side of filtered record item. Click on this icon, will show details of every change histories of this record.
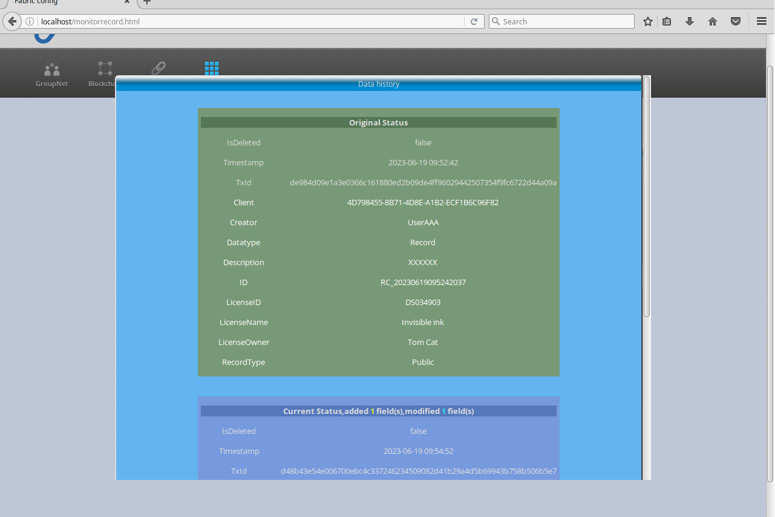

Figure 4E. Record change history list
Blockchain data can also be monitored via RESTReq command.
The command format is:
RESTReq Func:[InfoChain interface function ] RequestDeliver:True [key1]:[parameter 1] [key2]:[parameter 2] ...
For example:
RESTReq Func:QueryRecord RequestDeliver:True UserName:admin1 UserType:Admin RecordType:Protected Password:12345678
This command means administrator named admin1 (password:12345678) try to find out all protected records.
For InfoChain interface, please visit section "InfoChain Interace".
©2023
